Rev up your golf cart’s battery performance with our expert guide on how to test golf cart battery chargers. Say goodbye to battery issues and hello to a great round of golf!
Your golf cart battery charger is the lifeline of your golf cart. Without a reliable charger, your battery won’t hold a charge, leaving you stuck in a bunker (home all day!).
If you’re having issues with your golf cart battery, then it’s time to take a closer look at your charger. In this article, I’m going to show you how to test your golf cart battery charger and make sure that it’s working properly.
I’ll provide you with step-by-step instructions and some tips to help you keep your golf cart running smoothly. So, let’s dive in and get started!
Table of Contents
Key Takeaways
- Determine whether the charger or batteries are at fault
- Test the batteries and individual charging output
- Diagnose and fix issues with the charger components
How to Test Golf Cart Battery Chargers
| Step | Action | Description |
|---|---|---|
| Step 1 | Is the Battery Charger to Blame? | Determine whether the battery charger is the cause of the problem. |
| Step 2 | Examine the Batteries | Inspect the batteries to check for any visible damage or issues. |
| Step 3 | Charging Individual Batteries | Charge each battery individually to determine if any are not holding a charge. |
| Step 4 | If the Charger is the Problem | If the charger is determined to be the problem, take steps to fix or replace it. |
| Step 5 | Listen to Your Charger | Listen for any unusual sounds or noises coming from the charger. |
| Step 6 | Testing the Voltage Output | Use a voltmeter to test the voltage output of the charger. |
| Step 7 | Checking the Continuity of the Output Plug | Check the continuity of the output plug to ensure that it is functioning correctly. |
| Step 8 | Opening the Charger Case | Open the charger case to inspect the internal components. |
| Step 9 | Test the Ammeter | Test the ammeter to ensure that it is functioning correctly. |
| Step 10 | Testing the Capacitor | Test the capacitor to ensure that it is functioning correctly. |
| Step 11 | Diodes Testing | Test the diodes to ensure that they are functioning correctly. |
| Step 12 | Checking Transformer Windings | Check the transformer windings to ensure that they are functioning correctly. |
Step 1. Is the Battery Charger to Blame?
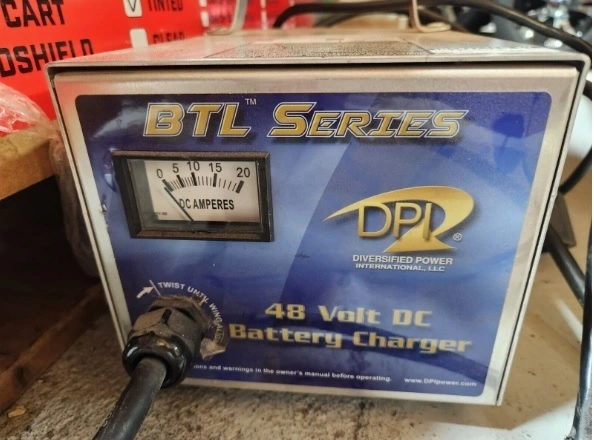
Most modern golf cart battery chargers won’t start charging if the battery’s charge is too low. A 36-volt charger needs at least 20 to 35 volts for the charger to kick in. And this is as much as 35-40 Volts for a 48-volt cart.
I don’t know about you, but I don’t have access to another golf cart to test out if the charger is working. So, let’s try another approach to see if we can rule out the golf cart as the culprit.
To do this, we can follow a simple troubleshooting process with the following steps:
- Make sure the battery terminals are clean and connected nice and tight.
- Check the golf cart’s wiring for visible damage or loose connections.
- Test the battery voltage of each battery in the stack to see if they meet the minimum for the charger to kick in.
Remember, the key is to rule out any issues with the golf cart itself before blaming the battery charger.
Step 2: Examine the Batteries
So, it’s time to give those batteries a closer look. I’ll grab my voltage tester and measure the output voltage of the entire battery pack. We need to make sure they can reach the minimum voltage required to activate the charger. If you have the charger manual, it’s helpful to check that for the minimum voltage.
We want to see if the golf cart batteries are providing enough juice. If they aren’t, well, we’ve found the issue. Remember those battery connections we talked about earlier? We should also check them for corrosion and check the cables. I also make sure the water level inside the batteries is okay.
Once we’ve fully checked the batteries, we can move on to the next step.
Step 3: Charging Individual Batteries
Do you remember when we talked about low batteries earlier? If your golf cart batteries are too low, we can charge them one by one with a standard 12-volt car battery charger. You can charge them right up or enough to meet the minimum voltage required.
If your cart has 12-volt batteries, charging them one at a time won’t be too much trouble. But, if you have 8-volt batteries, you can either:
- Use the 12-volt setting on your charger, connecting a 4.5-ohm 10-watt resistor in series. This limits the current to about an amp when the battery is full. The resistor acts as a safety measure to prevent overcharging of the battery and keep it in good order.
- Set your car battery charger to 6 volts and charge each battery for an hour. This should reach 7.8 to 7.9 volts, enough for all batteries to activate the golf cart battery charger.
Check the fuses during the charging process to ensure they’re in good order. A damaged or blown fuse might interrupt the charging process.
Step 4. If the Charger is the Problem
You know when your car battery charger doesn’t turn on? It’s frustrating, right? As you might know, manual chargers have a timer dial. This little guy helps you set the charging hours to avoid switch-offs.
Understanding your charger’s behavior helps prevent unplanned shutdowns. So, when the charger is the culprit, check the timer and adjust it as necessary so you know if that is the problem.

Step 5. Listen to Your Charger
While we’re in the zone, let’s listen to our battery charger. Plug it in, turn the dial on, and see if there’s any sign of life – maybe a hum, or a relay click followed by a hum? It might sound simple, but I can’t tell you how many times this little step saved me a headache.
If you don’t hear anything, it’s time to check the fuse on the charger. I know it seems basic, but trust me, this is often the culprit. Should you find a blown fuse, replace it. But, if the new one blows again right away, there’s likely a shorted diode hiding away inside the charger.
Remember, we’re looking for a charger that’s functioning as it should, with no surprises. Listening to the charger can tell us a lot, like the effects of temperature on its performance. Keep it brief, but don’t forget to use your ears when troubleshooting your charger.
Step 6: Testing the Voltage Output
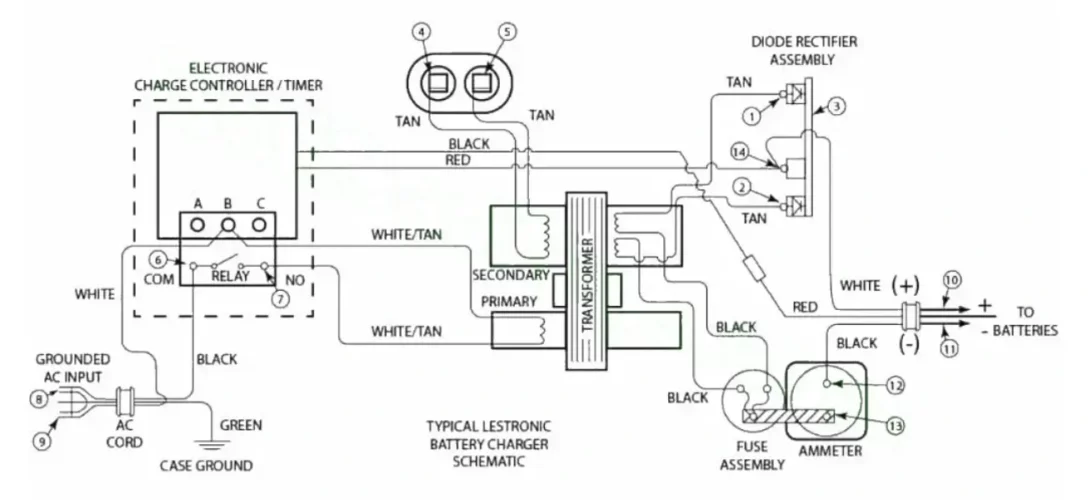
To check the output voltage of your golf cart battery charger, first turn the charger off. Then, set your multimeter to measure voltage. Connect the multimeter probes to the output contacts found on the charging plug. Now, turn the timer knob to “on” – the multimeter should show a voltage reading.
If you don’t get a voltage reading, it’s time to test for continuity. To do this, unplug the charger and connect the continuity tester cables to both blades of the power cord (8 and 9) while the timer knob is set to “on”. There should be detectable continuity here.
Step 7: Checking the Continuity of the Output Plug
Before we proceed, switch off the charger and disconnect it from the power source. Now grab your ohmmeter and let’s crack on!
We are going to check the continuity of your golf cart charger plug. Connect the ohmmeter’s positive lead to the output plug’s positive terminal (10). Connect the negative lead to the negative terminal (11). You should observe some continuity, maybe with resistance. If not, that’s a possible issue.
Now, let’s swap the leads! Connect the positive lead to the negative output terminal and vice versa. This time, there should be no continuity at all. If you observe continuity, it could mean you have a shorted or faulty diode.
So, the continuity test helps you detect any wiring problems in your charger plug. Remember always to be cautious while working with electrical components. Good luck!
Step 8: Opening the Charger Case
Once the case is open, it’s time to tackle potential electrical problems. First, set your multimeter to the continuity setting, and let’s examine the timer switch. This is the one thing that often fails on a charger, aside from the fuse. If there’s an automatic timer, you won’t see a twist-type knob upfront.
So, now attach the leads to both contacts (6 and 7) and give that dial a twist. We’re expecting continuity here. If the meter shows no continuity, it seems like the timer switch is the culprit.
Let’s move on and measure continuity between the charger contact’s end (10 or 11) and the termination point (12 or 14).
We’re checking both positive and negative, and the ground. If everything looks ok, it’s time to inspect the connections between the components on the charger’s front. Double-check the continuity across the meter and the connections to the fuse.
Step 9: Test the Ammeter
If there is no continuity or measurable resistance between points 12 and 13, you’ll need to replace the ammeter.
Step 10: Testing the Capacitor
When it comes to testing capacitors, there are three scenarios: good capacitor, open capacitor, and shorted capacitor.
For a good capacitor, set your ohmmeter to read resistance in ohms. Disconnect the capacitor leads from the transformer and connect the ohmmeter leads to terminals 4 and 5. If the capacitor is good, the meter needle moves to the middle of the scale at first and then quickly toward higher resistance.
Now, let’s talk about an open capacitor scenario. When you connect the ohmmeter leads to the terminals, the needle will stay at a high resistance. If you spot a visible bulge on the top of the capacitor, it’s likely open.
Lastly, a shorted capacitor behaves differently. When you connect the ohmmeter leads to the terminals, the needle jumps right to zero ohms and stays there. This indicates a shorted capacitor.

Step 11: Diodes Testing
Let’s focus on diodes for a moment. Diodes are crucial because they act as a one-way portal, allowing DC voltage to pass in one direction only.
To test them, get your continuity tester and connect the leads on points 1 and 3. Then, switch the positions of the leads. Ideally, you should detect continuity in one direction, but not the other.
Then repeat the process on points 2 and 3. And there you have it – a quick and straightforward way to test diodes! Let’s keep moving forward to make sure your golf cart battery charger is good to go.
Step 12: Checking Transformer Windings
Alright, let’s talk about checking the transformer windings on your golf cart batteries. Testing the windings is crucial. It makes sure that there are no open windings on both the primary side and secondary side of your battery charger.
First, grab your multimeter and follow the schematic on your battery charger. For reference, in most cases, the primary winding has two white or tan leads, and the secondary has only tan leads.
If you’re using an automatic battery charger, connect the batteries before turning on the charger. Give it a few seconds (around 3-4) for the time delay. No click or transformer hum? Make sure the connection between the charger and batteries is proper.
Double-check the plug socket on your golf cart for any corrosion or dirt. If it looks suspect, clean it up and try again.
So there you have it, a simple, step-by-step guide to testing your golf cart battery charger. I don’t know about you, but I’m pretty sure keeping it in great condition is worth the effort.
Before You Go …
Before you go, let me ask you this. Are you confident that your golf cart battery charger is of high quality and will last you for years to come? If not, then you need to read my next post: “How Long Does a Golf Cart Battery Charger Last? Don’t Let a Low-Quality Charger Hold You Back!”
In this post, I’ll dive into the common issues that arise with low-quality chargers. I’ll also provide you with the knowledge you need to choose a charger that will stand the test of time.
Don’t let a subpar charger hold you back from enjoying your golf cart to the fullest. Read my next post and ensure that you have the best possible charger for your cart.
Frequently Asked Questions
Here’s the FAQs
How to test a golf cart charger with a multimeter?
Do you remember when we talked about using a multimeter to check if a golf cart charger is working properly? Simply attach the voltmeter to the charger, turn it on, and you should see a reading of about 36 amps for a typical battery charger.
Common issues causing golf cart chargers not to turn off
Some common reasons include faulty timer circuits, damaged ammeter wires, and non-functioning relays.
Identifying a faulty golf cart charger capacitor
To figure out if a golf cart charger capacitor is faulty, you’ll need to inspect it for bulging, leaks, or cracks. If you notice any of these, it’s time to replace the capacitor.
Troubleshooting a non-working 48-volt battery charger
To troubleshoot a 48-volt battery charger that isn’t working, follow these steps:
- Check connections and cables for damage or corrosion.
- Confirm the charger is plugged into a functional power source.
- Test charger output voltage with a multimeter.
- If this doesn’t identify the problem, take the unit to an accredited repairer or follow the steps above.
Dealing with a humming charger that doesn’t charge
This can happen due to faulty diodes or transformer issues. Testing output voltage with a multimeter can help identify the problem.
Assessing partial battery charging
If you find your golf cart batteries only charging halfway, follow these steps:
- Check water levels in the batteries and refill if needed.
- Clean battery terminals and cable connections.
- Test individual battery voltage with a multimeter.
- Look for any damaged or loose cables.
So, this should give you a better understanding of how to tackle various issues related to golf cart battery chargers. Remember, maintaining your charger and batteries is crucial for optimal performance.
Related Posts
- How Long Does a Golf Cart Battery Charger Last? Don’t Let a Low-Quality Charger HOLD You Back!
- How Long Can A Golf Cart Battery Last On One Charge? Rev Up Your Ride With These Simple Steps
- Can You Charge A Golf Cart With A 12-Volt Charger? Don’t Try It Before Reading This Guide!
- How Often Should I Charge My Golf Cart Batteries? Don’t Let a Dead Battery RUIN Your Game