
We Take a Look at How to Test a Car Battery. We’ll deep dive into the problem, the tools you need, and the possible fixes when your battery is a dud.
Testing a car battery is important to ensure that it can do its main job – starting your vehicle. Without regular testing, you may find yourself stuck up a creek without a paddle. In this guide, we’ll go over how to test a car battery with a cheap multimeter.
I am a battery enthusiast and have tested countless batteries. In this article, I will tell you how you can test your battery and avoid the stickiest of moments.
In this article, we will take a look at
- What You Need to Test a Car Battery
- Step-by-Step Guide of How to Test a Car Battery
- Possible Repairs and Other Tests
Table of Contents
What You Need to Test a Car Battery
Before beginning the test, you should make sure you have the following:
A battery tester
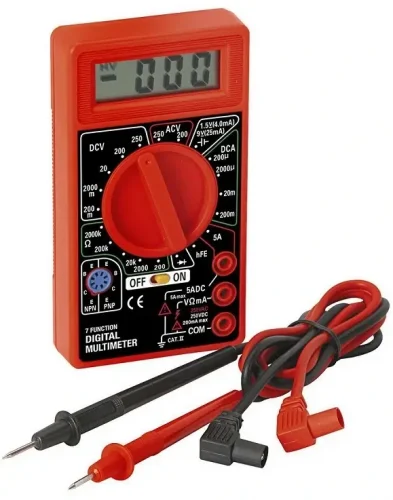
You need a cheap and simple device to make a decision on whether your battery is a dud. We recommend that you use a multi-meter, which will have the features you need to get that information. And it shouldn’t cost any more than $20. At the time of writing, they are available at Harbor Freight for less than $10.
Safety Goggles
As ever, when handling or working with a battery, safety is the primary concern. Because the battery contains acid and can produce sparks you should take the utmost care.
How to Test a Car Battery – Step-by-Step Guide
Here’s what to do
1. Kill the Engine
Before you start, switch off the engine and any in-car accessories such as lights and radio.
Switch on the Headlamps and keep them on for up to two minutes. This will dissipate surface charge from the battery. Now you will get accurate readings from the tests.
2. Set up Your Multimeter
If it is not auto-ranging, set your multimeter to 20 Volts DC. Ensure that the multimeter is not set to AC, which is for testing household electricity from the grid. So unless you want to test your washing machine, we’ll stick to DC.
If your multimeter does not have a 20 Volt setting, select the next one down over 15 Volts.
3. Inspect the Battery
Before starting physical tests, inspect your battery. First, make sure the connectors are nice and tight. Next, make sure that there is no build-up of corrosion on the terminals. If there is, follow the steps in my guide to removing battery corrosion to clean it up. Also, ensure there are no cracks or signs of bulging. If there are, skip the testing part and go straight to a new battery.
4. Connect the Multimeter
Connect the multimeter to the positive (+) and negative (-) terminals of the battery.
Place the red lead on the positive terminal and the black lead on the negative. You can tell which is which by the +/- symbols. Red and black flaps may cover the positive and negative terminals respectively.
Make sure that all connections are tight and that the leads are not touching any metal parts of the engine.
If your multimeter has probes, you only need to touch them to the terminals to get a result.
5. Read the voltage
Turn the tester on and read the voltage. The voltage should read 12.6 Volts or higher. If the voltage reads lower – 12.4 Volts or less – it is likely that your battery has a problem.
If you get a negative (minus) reading, you are touching the probes to the wrong terminals.
6. Interpret the results
As I said, if we get a result of 12.6 Volts or higher, we’re happy. But what does it mean if the battery says less? Well, a 12.2 Volt reading indicates that your battery is only 50% charged. We can use a table to determine the percentage charge a battery has, like this:
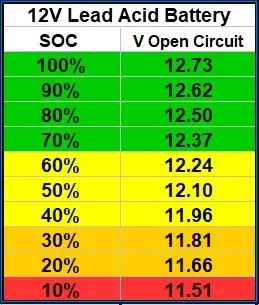
If your battery won’t go above 10.5 Volts while charging, this indicates a dead battery cell.
If higher than 10.5 Volts but still under 12.6, your battery may have become sulfated and need replacement.
Cranking Test
If your battery shows 12.6 Volts or more you can move to the next part of the test. This is to determine the cranking ability of the battery,
As the name implies, we test the battery while the engine is cranking (starting).
Start the engine while monitoring the voltage readout on your multimeter.
You can make this easier by using an assistant who can turn the key while you watch the multimeter.
To make your life even easier, you may want to invest in a multimeter with a MIN/MAX function. Press the min/max button and then start the engine. The meter will record the min and max voltage during the test.
If your battery stays above 9.6 Volts during the test, then your battery is still doing its job. It should still crank the engine even on cold and wet mornings.
You can also use the MIN/MAX function to measure the voltage while the engine is idling. This will give you an idea of your battery’s normal performance.
Test the Alternator
Remember that these problems aren’t always related to a bad battery. Other common culprits when the engine won’t start are a faulty starter motor or a bad alternator. A faulty alternator will not charge the battery, and you may find that the battery has run out of juice as a result.
If the engine starts but won’t stay on, it is likely that a faulty alternator is your problem. This means that it is failing to charge the battery and it is the alternator that may need replacing.
If your headlamps get brighter when you rev the engine, it may also be an alternator problem. It may be producing some current but in an insufficient quantity to keep the battery charged.
Running the test with the engine running can indicate a problem with your alternator. This test will confirm that the alternator can charge the battery when the engine is running.
Once the engine is running, connect the multimeter to the battery and note the voltage. Watch out for moving parts in the engine.
While the engine is running look for a reading between 13.6 and 14.6 Volts.
This figure adds the voltage from the alternator to the existing voltage of the battery. So, if the battery holds 12.6 Volts, a decent reading when the engine is running should be around 14.6 Volts.
A reading within this range shows that the alternator is delivering power to the battery.
A result above 14.6 volts means that the alternator is overcharging the battery. Long-term this can damage the battery and your vehicle’s electrical systems. This is most likely due to a bad voltage regulator in the alternator.
A result below 13.8 Volts shows that the alternator struggling to keep the battery charged. It may be time for a new one.
Further Tests
The first thing to do is determine whether the battery can hold a charge or whether it is dead. If it can charge then you may need to move on to other tests to determine what the root of the problem is.
With that in mind, the first thing to do is to put a charge into the battery. You can do this by driving the vehicle. If the battery is flat, then jump the engine. The alternator will charge the battery as the car is running. But be sure to run the engine for at least 20-30 minutes. And drive the car rather than letting it idle. This will ensure that the battery gets a good charge.
Alternatively, if you cannot jump the engine, use a simple battery charger to get your battery up to speed. If the battery has not reached 12.6 volts after the charge, you may need to have it tested and replaced.
After charging, leave the car to stand for a while. This might be overnight, or it might be longer.
When you come back to the car, check the voltage once again. If the voltage is lower than 12.4 volts then your battery is not holding a charge.
A battery consists of six cells, which generate 2.1 volts each. A good battery should show at least 12.6 volts or higher meaning that each cell is doing its job.
If the battery shows 10.5 Volts or less when under a load (for instance cranking the engine), it has a dead cell. A dead cell usually means that the battery will need replacing.
Replacing your battery is usually the best option if it has a dead cell. But there are some techniques that you can try to revive your battery, at least temporarily.
If the voltage is less than 12.6 Volts but above 10.5 then your battery has experienced sulfation.
Sulfation is the build-up of sulfate crystals on the plates of the battery. They reduce efficiency and can stop the battery from being able to accept a charge.
This can be treated with a special cycle desulfation charger. This will break down the sulfate crystals, allowing the battery to accept a charge.
Lastly, your battery can suffer from parasitic loads. This is when malfunctioning accessories take small amounts of electricity from your battery. Poor connections, faulty fuses, or a faulty alternator can all cause these.
Measuring the Specific Gravity
This involves using a hydrometer to measure the specific gravity of the electrolyte. We compare the weight of a sample of the battery’s electrolyte to the weight of an equal sample of pure water. The electrolyte in a lead acid battery is 25% sulphuric acid and 75% distilled water. A good battery will have a specific gravity of 1.25 or higher.
If the specific gravity is too low, it may indicate the battery is not able to hold a charge.
It is best to make sure that your specific gravity is spot on before drawing any conclusions. If your battery is under two years old and can’t hold a charge, an incorrect electrolyte mix may be to blame. By remedying the imbalance, oftentimes you can remedy your battery’s problem.
A battery conditioning product added to the cell can often do the trick.
If you determine that the old battery needs replacing you will need to remove it and fit a new one. Bear in mind that new batteries need to be installed right, or you may find yourself with the same problem again.
If you determine that the old battery needs replacing you will need to remove the old battery and fit a new one. Bear in mind that new batteries need to be installed right, or you may find yourself with the same problem again.
Here’s a video showing a specific gravity test.
Do a Cold Cranking Amps (CCA) Test
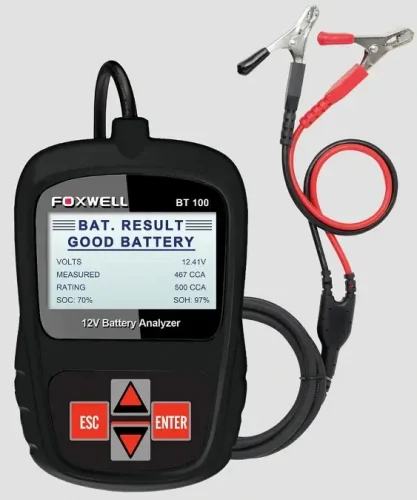
Unfortunately, most multimeters won’t measure the CCA of the battery. This can be an important metric when testing your battery. You’ll need to buy a special battery analyzing tool to get an accurate result. Battery testers that measure CCA include the Topdon 101 Battery Tester and the Foxwell 12V battery analyzer.
You can use these devices to test the battery’s Cold Cranking Amps. Connect your device to the battery in the same way as a multimeter. Input the CCA figure printed on the battery label into the device. The device will tell you whether your battery’s CCA is still on the money. If it has dropped then your battery needs changing.
Maintenance you can do yourself
If you have a flooded lead acid (FLA) battery, you can troubleshoot some problems yourself. But if your battery is a maintenance-free battery, there is nothing you can do. You will need a replacement.
If you can open the battery, you can look inside the cell to check if it is dry. ALWAYS wear safety glasses when opening and inspecting car batteries. If one of the cells appears dry or has broken plates, it is a sign that this is the cell causing the problem. You should also take note of any furry build-up of residue on the battery plates. This is a sign of sulfation. It probably means your battery is approaching the end of its lifespan. But by adding a desulfator, you may be able to ‘revive’ the battery for a short period of time.
You can also check the electrolyte level. The electrolyte should submerge the battery plates at the bottom of the cell. If it does not, add some distilled water, charge the battery and run the tests again.
Get your battery tested by a pro
This might all sound like too much hassle or you might not feel confident testing your own battery. If that’s the case it’s worth going to your local garage or auto parts store and having it tested by a professional.
Autozone, O’Reilly Auto Parts, Napa, Pep Boys, Advance Auto Parts, Costco, and many others offer free checks. They will come out and use industrial testers to measure your battery’s stats. Then they can diagnose any problems. They will also test your starter motor and alternator using state-of-the-art diagnostic equipment.
Symptoms of battery failure.
But why would you test the battery? What would prompt you to take that crucial step?
First, I recommend that you check and test your battery on a regular basis, regardless of any symptoms. This means that you can stay ahead of the curve and prepare for any potential problems. But it’s good to know what symptoms to look out for. This can help you diagnose any potential issues.
Common symptoms of a dead battery include:
Trouble starting the vehicle
The engine is slow to start up (cranks too slowly) or won’t start at all. Sometimes you may find that the engine will try to start and turn over. Other times there may be only the dreaded clicking sound no one wants to hear.
Dash Light
The battery light on your display stays on. This indicates a potential problem.
Electrical Problems
Problems with the lights. You may notice that your interior lights or headlamps are dimmer than usual. Even if the engine is running they may still dim or flicker when the engine is running. It is also possible that other electrical accessories may behave erratically. These may include sat navs, windows, door locks, climate control, and more.
A bad smell
Your battery smells bad. If you detect a bad odor reminiscent of rotten eggs, it may be coming from your battery. Leakage of hydrogen sulfide causes this and it is indicative of a failing battery. But bear in mind that overcharging can also produce the same effect.
Signs of Physical Decay/Damage
Check that your battery is in good physical condition. Telltale signs of a battery in distress include corrosion or leaking. You can clean battery corrosion on the terminals to get extra lifespan from your battery. But it is often a better option to replace the battery if you want to keep everything in tip-top condition. Cracked or swollen casing is also a bad sign and means that a replacement will be necessary.
Like How to Test a Car Battery? Check out our Related Articles.